Tasks are a way for communication between departments so that additional work effort can be tracked. Tasks will be assigned to a department to resolve and will include a category and sub-category for reporting purposes. A Representative would create a task when there is something on an account that they themselves cannot resolve without others intervention on the situation.
How to Add a Task to an Account
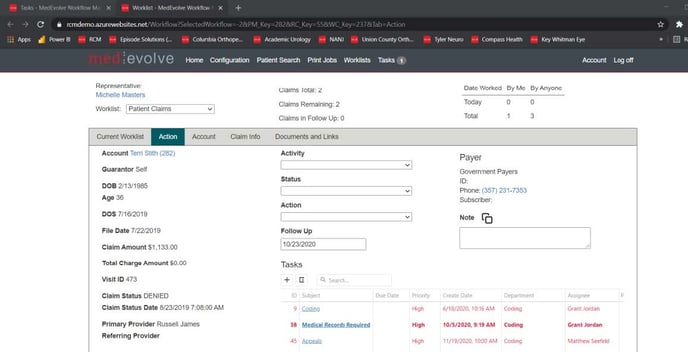
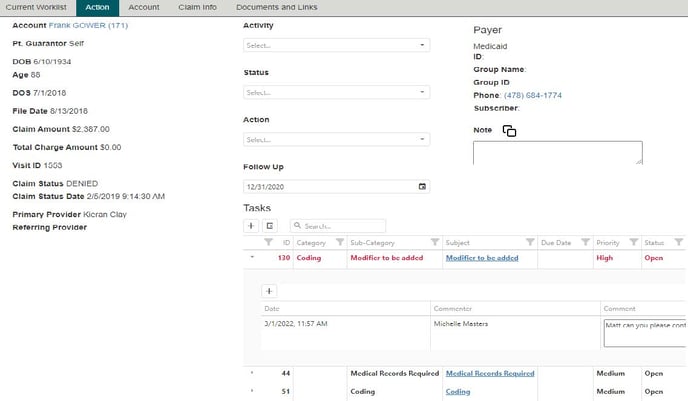
- Users have the ability to add a Task to a patient account for a specific date of service by clicking on the “Action” tab within any Workflow modules. The Tasks section will be midway down the page.

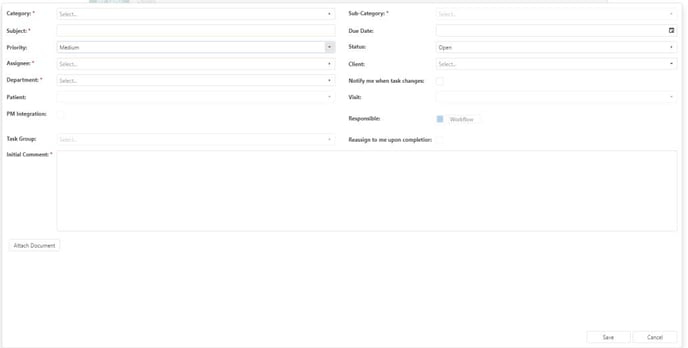
- To create a Task, simply click the “+” sign to launch a separate window where users must select a pre-configured drop down list for the category, sub-category, subject, due date based on the action needed, and assignees needed to review the task, which are all required fields in order for the task to be created. There is also an “Initial Comment” box where users can enter more details regarding the task. Once all fields have been completed, click the “save” button and the new task should appear in the grid with a summary of the details.
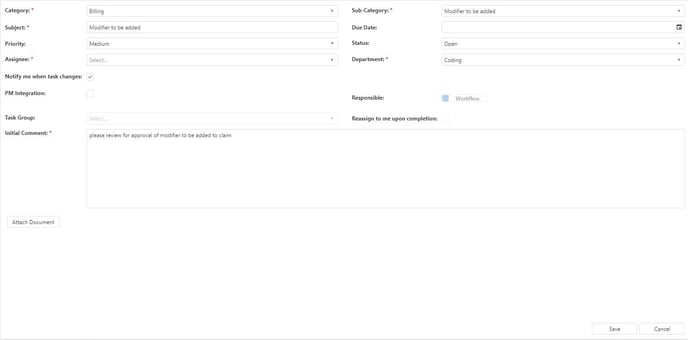
- Users should note the options note the options in the task drop down lists are based on the category that is selected. For instance, if a user selects the “Call Center” category, the sub-category/subject selection will be specific to that department and list options such as “Collection past Due Balance”, where the “Billing” category would only show a sub-category/subject option for “Modifier to be added”.

- Users should also note the individuals available to be selected in the assignee drop down list will be tailored to the department that individual works in, so the task is routed to the appropriate person and department.

How to Add a Generic Task Not Associated with an Account
- Users also have the ability to create a Task without going through a patient account within a worklist. To do this, select the Tasks option in the MedEvolve header at the top of the screen and simply click on the “+” sign within the Task Grid.
- This will launch a separate window where users must complete required fields and select from a pre-configured drop down list for the category, sub-category, subject, the due date which should be based on the action needed, and assignees needed to review the tasks. The “Initial Comment” box is where users will enter more detailed information regarding the tasks, like the patient account number. Once all fields have been completed, click the “save” button and the new task should appear in the grid with a summary of details. Note – If the task creator would like to have the task returned to them for final review once it has been completed by the assignee, they will need to click the “Reassign to me upon completion” box, where they will be required to hit the complete button again after reviewing the details in order for it to fall off their Task list.
How to Access Any Tasks Assigned to You
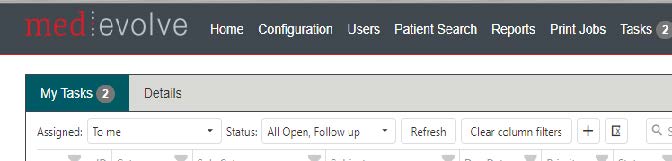
- To determine whether a task has been assigned to them, users can reference the Tasks icon at the top of their MedEvolve toolbar. If there is a number in a circle next to the word “Tasks”, this is an indicator there are new tasks or unread comments that need to be reviewed.
![]()
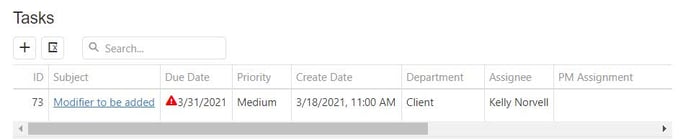
- Once the user has clicked on the “Tasks” icon in the toolbar, the grid will default to open the list of tasks assigned to that individual user, as well as tasks assigned to the user’s Department that someone has not taken ownership of yet. The unread tasks will appear in bold font, as shown below.
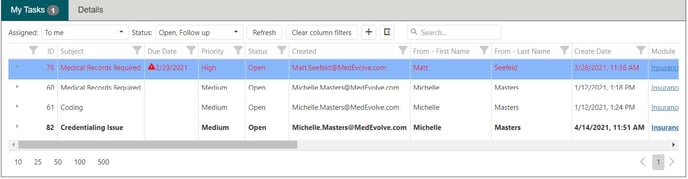
- Any tasks that are overdue will appear in red bold font, so it is important to remember to work the list of tasks daily.

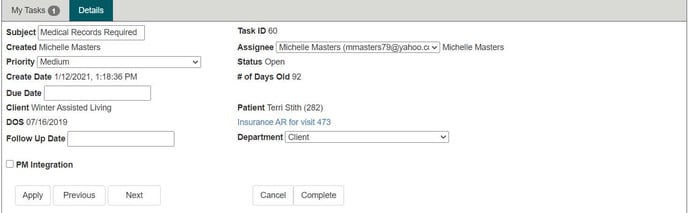
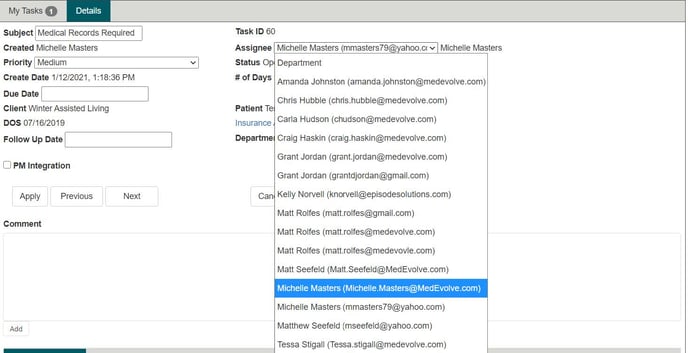
- To review a task, simply click on it to see the details of what is required to complete the task, who created it, and any associated documents needing to be reviewed, as well as the due date the task needs to be completed.

- Users will be able to review the comments and messages from others who have worked the account, as well as be able to add their own once they’ve finished.
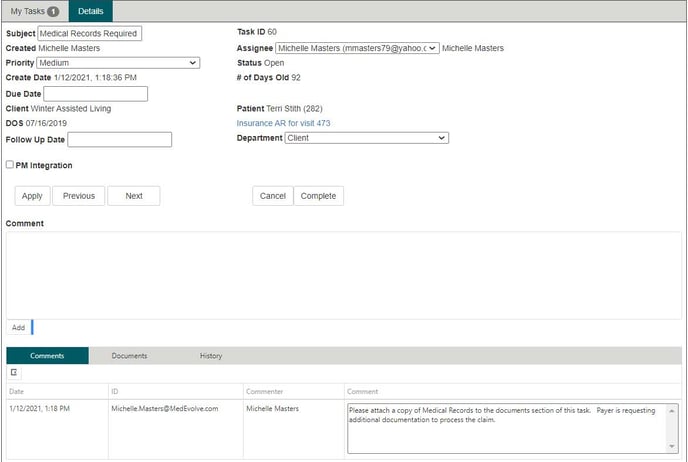
- If a user is opening a task assigned to their Department, they will need to make sure they click the “Take Ownership” button underneath the Assignee box, so it will be removed from the task list for other members of their department.

- Additionally, if a user opens a task and takes ownership of it only to discover it is not a task they are able to work or needs to be reassigned to the appropriate Department, then they must click the “Relinquish Ownership” button and change the assignee filed back.

- After reviewing the details in the comments, users can access the patient’s account for that visit by clicking the blue hyperlink which will open a separate browser tab within Workflow where the account can be reviewed for further details.
- Once the account has been reviewed, users can return to the original Workflow tab with Tasks open to add their additional comments in the comment section.

- Additionally, users may also add their task comment within the visit on the “Action” tab by scrolling down to the Tasks section and clicking the arrow to expand the task they are working for that patient and then clicking the “+” sign to open the comment box.
- Users will need to make sure they go back to the original Workflow tab with Tasks open to reassign the task back to the person who sent it to them from the “Assignee” drop down list and click the “Apply” button, so the task will reappear in the creators list to review the additional details which were added.
- If a user needs additional time to review an account before sending it back to the creator, they will need to change the status from “Open” to “Follow Up” and enter a note regarding the reason for the delay, as well as a follow up date in the appropriate fields. Once those changes have been made, users will click the “Apply” button, then simply click on the “Next” button to continue reviewing any additional tasks within the list.

- If a task has been reviewed and no further action is needed, the user will click the “complete” button to change the status and be prompted to enter a final comment regarding the resolution before the task can be closed.