
ACCESSING TABLES
-
Left click “Tables” from the MedEvolve PM home screen.
ACCOUNT
ACCOUNT CATEGORY
Tables → Account → Account Category
The financial class of the patient. This will only affect when the patients are billed after insurance is filed. This is NOT adding insurance to the patients account.
Select the category that best fits the type of insurance the patient has. (Ex: for United Healthcare, you would select the category ‘Commercial’).
Code – Code associated with the account category.
Description – Description of the account category.
Billing Default – Choose send statement after insurance, send statement immediately or never send statement depending on the specified account category.
Allow Messages – Allow dunning messages to print on statements send to patient with the specified account category.
Dunning Messages – Messages printed on statements sent to patients with the specified account category depending on the date the account went into a bill status.
Account Information Required Fields – Required account fields for patients with the specified account category.
Patient Insurance Required Fields – Required insurance fields for patients with the specified account category.
ACCOUNT SOURCE
Tables → Account → Account Source
How patients are hearing about your office.
This will allow you to keep track of your marketing strategy.
Code – Code associated with the source.
Description – Description of the source.
ACCOUNT STATUS
Tables → Account → Account Status
This field is where this patient’s status goes.
There are only two account statuses that will allow you to move on throughout the system without assigning an account number (responsible only & new patient). Most of your accounts will be active.
Code – Code associated with the account status
Description – Description of the account status
Use Account Category Required Fields – This will override the required fields from account category and base the required fields on the account status.
Status Flags – Choose the appropriate status related to the code/description you are creating. (Active, Inactive, New, Deceased, Responsible Only, Expired)
Account Information Required Fields – Required account fields for patients with the specified account status.
Patient Insurance Required Fields – Required insurance fields for patients with the specified account status.
ACCOUNT BILLING
Tables → Account → Account Billing
This is telling when the patient will receive a statement, if they receive a statement. This is auto-populated by the Account Category.
Open Item – Will list all visit details on every statement
Balance Forward – Will list visit details on first statement and then every statement after would only show the balance
None – No statement
Do not bill – Patient will not receive a statement.
Bill after tertiary insurance – Patient will receive a statement after tertiary insurance. If patient does not have a tertiary insurance, they will receive a bill after all insurance on the account has been filed.
Bill immediately – Patient will receive statement immediately.
ACCOUNT LIST
Tables → Account → Account Lists
This is where the Ethnicity, Race, Preferred Language options are. Cannot be altered due to CMS guidelines.
ACCOUNT MEMOS
Tables → Account → Account Memos
This is where you can create memos to generate in default account memos.
ADJUSTMENT
ADJUSTMENT
Tables → Adjustment → Adjustment
Where you add adjustment codes. If they are approved write off codes you will need to select: APPROVED WRITE-OFF as well as HIPAA CODE.
DENIAL MANAGEMENET
Tables → Adjustment → Denial Management
This is where all denial codes are housed.
APPOINTMENT
APPOINTMENT CATEGORY
Tables → Appointment → Appointment Category
Category for an appointment reason to fall under. (New patient, Follow Up, ETC.)
These are the foundations for your appointments scheduled.
APPOINTMENT REASON
Tables → Appointment → Appointment Reason
Reasons for the appointment. (Injection, Office Visit. ETC.)
These will be used when scheduling appointments. These can be setup to display different colors based on the reason.
Create Auto Block – This will automatically block additional time for appointments that require more than your appointment slot allows.
APPOINTMENT ROOM
Tables → Appointment → Appointment Room
This is where you would create the rooms for the appointments. (Exam Room 1, Exam Room 2, ETC.)
This is typically not used in MedEvolve. If rooms are assigned, this is done in your EMR.
APPOINTMENT STATUS
Tables → Appointment → Appointment Status
This is where you would create appointment statuses. (Pending, Confirmed, Patient in Waiting Room, Arrived, ETC.)
Include in Office Time Calculation – This will allow you to see how long patients are actually in your office using a utility in MedEvolve.
APPOINTMENT SETS
Tables → Appointment → Appointment Sets
This allows you to schedule appointments with multiple resources on the same day.
CPT FEES
CPT GROUP
Tables → CPT Fee → CPT Group
This is where CPT Group names are housed.
This is a default table that is set up by MedEvolve. This should not need to be changed.
CPT FEE SCHEDULE
Tables → CPT Fee → CPT Fee Schedule
This is where you could set up Alternate Fee Schedules, search for existing CPT codes or add new codes.
You can also create modifier rules for a selected fee schedule by clicking the ‘New Modifier Rule’ icon and completing the Modifier Rule form. Enter the modifier and designate if the charge and/or allowed amount should increase or decrease by the entered percentage when the modifier is applied in posting.
PROCEDURE SETS
Tables → CPT Fee → Procedure Sets
This is where you would create procedure sets if there are multiple CPT codes that will commonly be charged together.
DIAGNOSIS
DIAGNOSIS CODE
Tables → Diagnosis → Diagnosis Code
This is where you will input in your diagnosis codes.
Code – The diagnosis code should be keyed here with not decimals or spaces.
Code Typep – ICD10.
Short Description – Description of the diagnosis code.
Group – Group that the diagnosis code belongs to.
DIAGNOSIS GROUP
Tables → Diagnosis → Diagnosis Group
These are different groups in which your diagnoses codes will fall under. This is defaulted in and should not need to be changed.
DUNNING MESSAGES
DUNNING MESSAGE
Tables → Dunning Messages
This is where you would place a message that you would like to print on all of your statements.
Code – The code associated with the dunning message.
Description – Description of the dunning message.
Message Line 1 – Your message will be entered here.
Message Line 2 – Your message can be continued on a second line here.
EMPLOYER
EMPLOYER
Tables → Employer
This is where you would place information for employers of patients. (Code, address, contact info)
INSURANCE
ELECTRONIC CLAIMS FORMAT
Tables → Insurance → Electronic Claims Format
Our Enrollment Specialist will set up for you. This points to where your clearing house is networked to.
This will typically be hidden so no changes are ever made to it.
INSURANCE CATEGORY
Tables → Insurance → Insurance Category
This is something that our Enrollment Specialist will set up for you Pre Go-Live.
If additional insurance categories are needed, please contact MedEvolve to set this up for you.
INSURANCE PLAN
Tables → Insurance → Insurance Plan
This is also something that our Enrollment Specialist will set up for you Pre Go-Live.
Additional insurance plans can be created here. Please be cautious of creating duplicate insurance plans in an effort to keep the database as clean as possible to avoid errors when adding insurance plans to patient accounts.
CLAIM RULES
Tables → Insurance → Claim Rules
These act like Claim Scrubbers. These will stop claims from going out if there is something wrong with them. Our Trainers will set this up with you during Go-Live week.
These claims will show up on your unprocessable claims report.
LOCATION
LOCATIONS
Tables → Locations:
This is where you would place the locations that you would be billing from and scheduling appointments.
When entering the information, be sure to include the legal name of the practice along with wit 9 digit zip code to ensure that paper claims are sent with accurate information.
You will notice 4 tabs:
BILLING:
This is where you will put in the billing information such as address. If you are allowing billing for this location you will put in the same address as the location. If you are not allowing billing for this location you will leave this section blank.
INSURANCE:
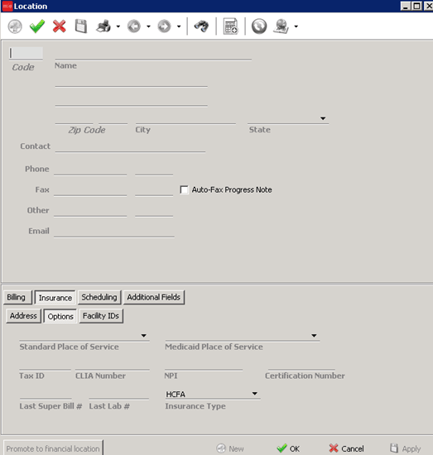
Set up Options Tab:
-
Standard and Medicaid place of service
-
Tax ID
-
CLIA # if billing labs
-
NPI
SCHEDULING:
This is where you would choose if you want to make this a location that you can schedule for appointments.
Also, you can change the location name that will appear on the schedule and choose a color if you like to color coordinate your scheduler.
ADDITIONAL FIELDS:
This is typically not used.
PAY CODE
PAYMENT CODES
Tables → Payment Codes
This is where you would create a code for payment types (Cash, Credit Card, Check, etc.)
Keep in mind that these are only related to patient payments.
Code – Payment code
Description – Description of the payment code
Payment Type – Typically a 1:1 selection. This is used for reporting purposes.
PHYSICIAN SPECIALTY
PHYSICIAN SPECIALTY
Tables → Physician Specialty
This is where the physician specialty table is housed. This is set up by default but additional physician specialties can be added here.
PROVIDER NUMBERS
PROVIDER NUMBER
Tables → Provider number
Where your providers will be set up with locations and insurance. This will be set up pre Go-Live. If additional provider numbers need to be added, MedEvolve will set this up for you.
RECALL MESSAGE
RECALL MESSAGE
Tables → Recall Message
This is where you would input your recall messages that you would like to send patients, if you are using recalls.
REFERRING PHYSICIAN
REFERRING PHYSICIAN
Tables → Referring Physician
This is where you would input your referring physician info. (Name, NPI, Address)
Keep in mind that the NPI information is required when adding referring providers.
RESOURCE
RESOURCE
Tables → Resource
This is where you would input your resource information. Such as the code, the name, and the mailing address (optional). You will also place the signature for this resource.
REVENUE CODE
REVENUE CODE
Tables → Revenue Code
This is where you would input your revenue code and description
SCHOOL
SCHOOL
Tables → School
If the patient attends school, this is where you would input this information.
TASK MANAGER
AUTOMATED TASK TEMPLATES
Tables → Task Manager → Automated Task Templates
This will allow you to create automated task templates based on certain areas of the PM. These automated task templates will automatically create base on if certain criteria is met.
TASK TEMPLATES
Tables → Task Manager → Task Templates
Here you can create templates for task manager. This will allow you to assign a type, status, priority, due date and users to a specific template. Anytime the template is selected for use, the assigned information would automatically populate.
TASK TYPES
Tables → Task Manager → Task Types
Here you can create a “type”, or category, for tasks. (Denial, Unprocessable Claim, ETC.)
TASK USER GROUPS
Tables → Task Manager → Task User Groups
Here you can create user groups to assign tasks to, instead of one person. (Billing, Front Desk, Techs, ETC.)
ZIP CODE
ZIP CODE
Tables → Zip Code
Default zip codes that currently exist are already populated, but if there are any zip codes that our system does not recognize, you can input them here.