How to Add Insurance On a Patient Account
Adding Insurance to a Patient Account
All screenshots taken from our playground environment.
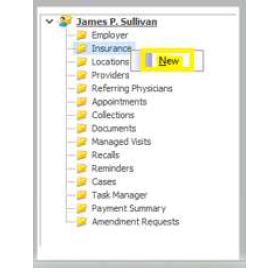
Step 1: Right click on the Insurance Folder and click 'New'

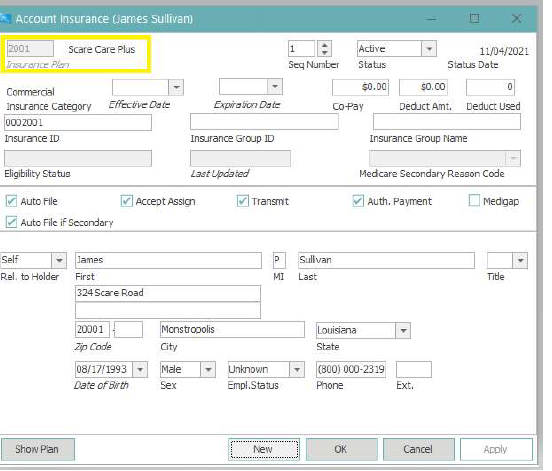
Step 2: Attach the appropriate insurance plan (Search for the insurance plan by clicking the italicized words 'Insurance Plan' or press F3 while cursor is in plan code field)

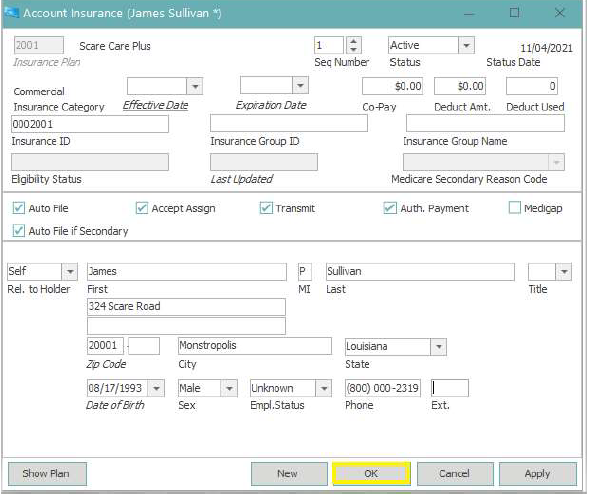
Step 3: Add appropriate Insurance information and verify Rel. To Holder/Subscriber Information then click OK

ACCOUNT INSURANCE FILED DICTIONARY
Insurance Plan – enter the insurance plan code or perform an insurance plan search by selecting the italicized word ‘Insurance Plan’ or navigate to the field and press F3.
Seq Number - displays what sequence the new plan will be placed once added to the patient tree. Use the up or down arrows to change the sequence. Insurance sequence can also be changed directly from the patient tree – see the Insurance Sequence section below.
Status – The status of the insurance plan. The drop-down options are active or inactive.
Status Date – Automatically updates to reflect the date the status was last changed.
Effective Date and Expiration Date – The effective date and expiration date of the insurance plan. This information allows notifications of expired plans to auto- populate as a pop-up reminder on the patient’s account. This also allows claim rules to trigger if dates of service are entered on a claim that are outside of the effective/expiration dates of the insurance plan.
Co-Pay – Used to manually record the patient co-pay for the selected insurance plan. This allows the primary insurance co-pay amount to display on appointments for that patient.
Deductible Amount and Deductible Used - Used to manually record the deductible details related to the patient’s insurance plan. Important note: To remain accurate, staff must keep the amounts updated.
Insurance ID is required. Enter the insurance policy number in this field.
Insurance Group ID should only be filled out if the group ID is available. If it isn’t available, leave this blank.
Insurance Group Name should only be filled out if the group name is available. If it isn’t available, leave this blank.
Eligibility Status and Last Updated will populate the status and date of the latest eligibility check for that insurance plan. To view the eligibility details from this screen, click the italicized words Last Updated.
Medicare Secondary Reason – This will only be used If Medicare is secondary. Select the appropriate Medicare secondary reason code from the drop-down.
Checkboxes – The checkbox options in the middle section (below) will automatically check or uncheck items as needed, based on the insurance plan and insurance category setup.
Important Note: Do not check or uncheck these options, as this could create issues with claims.

Guarantor/Subscriber Information – The lower section is used to record the guarantor/subscriber information. The guarantor information defaults with details from the patient’s account. If the policy holder is not the patient, select the appropriate Relationship to Holder, then enter the name, address, date of birth, sex and phone number for the policy holder.
