
If users are on an older version of MedEvolve they will not see an option for Insurance or "No Bill" items under Refund Processing. We also recommend using the Allocate Transaction Credit Balances module first to ensure that the credits for patients overpayments are distributed to patient debit amounts.
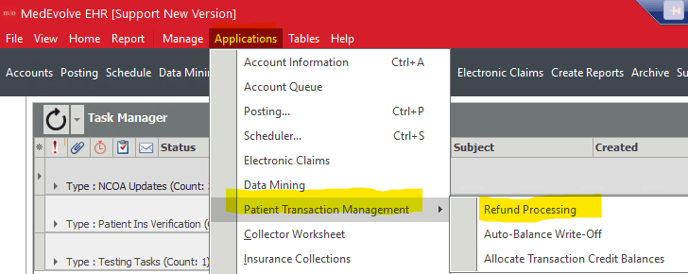
To use our Refund Processing Module go to Applications Tab-->Patient Transaction Management and then select Refund Processing.
The following window will appear
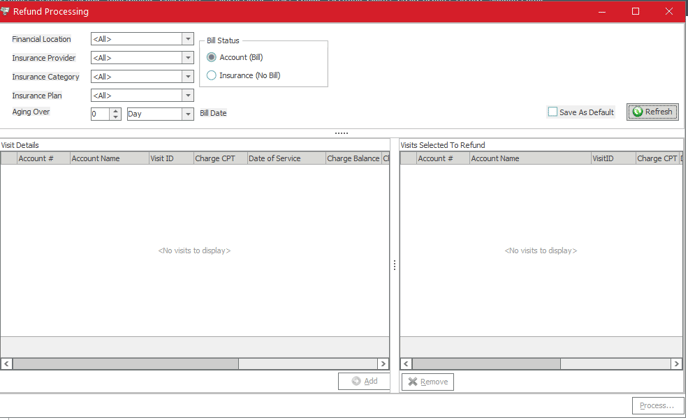
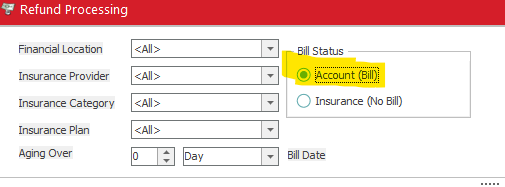
The following filters can be used to narrow down criteria you wish to look at for credits to refund.
- Financial Location - Financial location at the visit level where the credit is present
- Insurance Provider - Provider who the claim was billed under on the visit
- Insurance Category - Insurance Category for the active insurance on the visit the credit belongs to
- Insurance Plan - Specific Insurance Plan the credit belongs to on the visit
- Aging Over -
- If Account (Bill) is selected it is the number of days since bill date for the credit.
- If Insurance (No Bill) is selected it is the number of days since date of service for the credit
- Bill Status
- Account (Bill) Credits in bill status that are patient responsibility
- Insurance (No Bill) Credits in No Bill Status that are Insurance Responsibility
- Save as Default - If selected it will look at current parameters and each time module is opened will use those same settings
- Refresh - Once Criteria is selected it will pull in accounts that match the criteria. If no criteria is selected will pull all for either bill or no bill credits
Once the users hit refresh it will pull accounts with credit balances. Users have to select Bill or No Bill for the bill status.
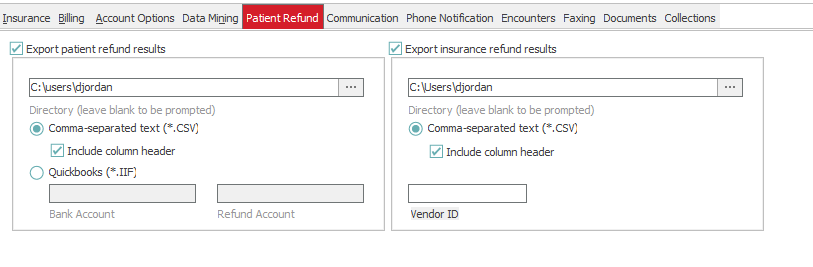
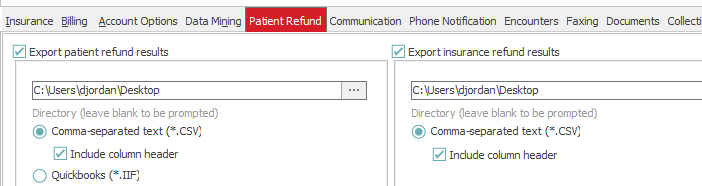
Users will also need to make sure if they wish for a report to be generated, that they have the export results set up under Manage Tab_Enterprise_Patient Refund Tab. See below screenshot.
Right click options include
- Go to
- Account - Bring up the account information for the patient user right clicked on
- Visit - Go to the specific visit the credit is on to view why there is a credit
- Add - will be greyed out unless the transaction has the process box checked
- Select All - Select all credits in list
- Unselect All - Unselect any selected credits in list
- Reset View - Will reset columns to default if they have been moved.
- Options - Will open the Enterprise level setting for refunds
To select visits to refund select the check marks beside the line items and then select Add
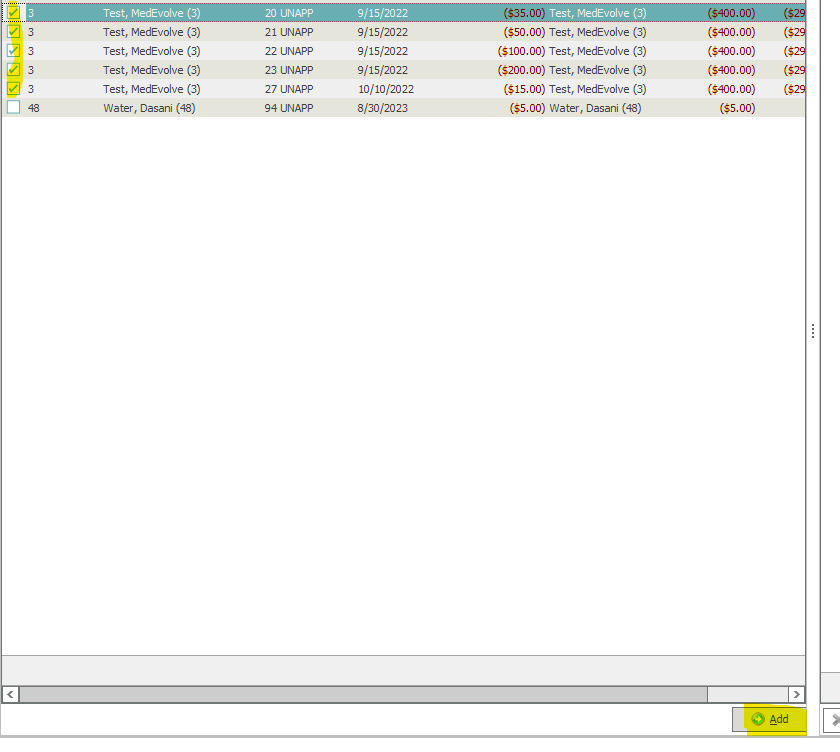
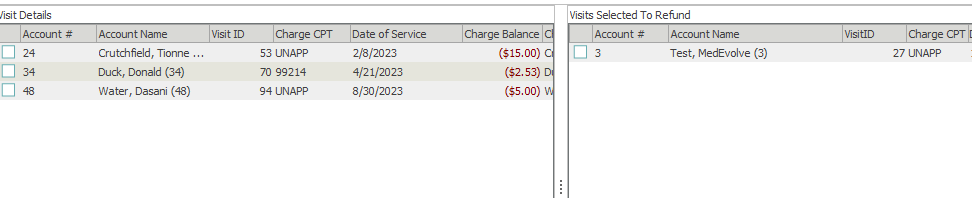
The selected visits will then move to the right side under Visits Selected to Refund. If users realize they have selected something they do not wish to refund they can select the visit again and click remove.
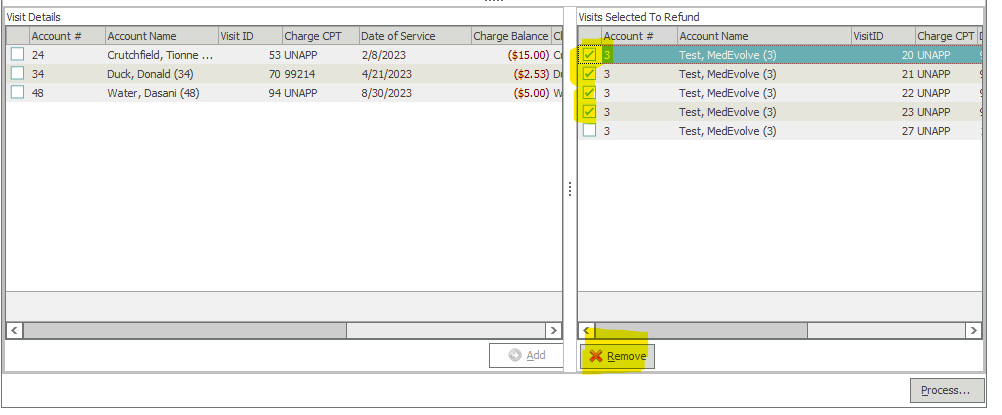
This will then remove those visits from the listing
Once the visits are selected that users do wish to refund they will hit process and the following window appears
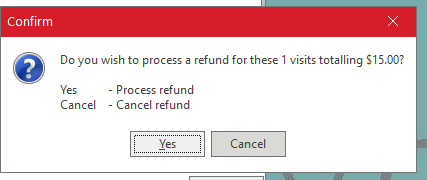
Users can click yes if they wish to perform the refund or Cancel if they no longer want to process the refund.
if they select Refund for the Account (Bill) Visits the following will appear for patient refunds. Users will select the option for refund method (Debit Payment or Debit Adjustment) and the code (if they selected debit payment it will be pay code and if the selected adjustment they would choose the adjustment code) and the description would auto populate
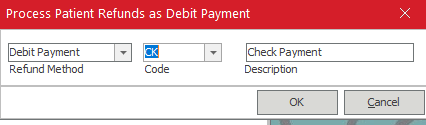
Please note: Once you have selected process the refund will go into a control and that control will automatically be closed. If the users processed any transactions by mistake these will have to be manually reversed as we DO NOT reopen controls once they have been closed.
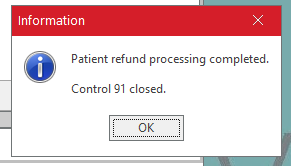
If the user selects visits to Refund for Insurance (No Bill) and selects process it will not bring up the refund method window as the only option is II for an insurance reversal. It will still auto close the control once processed.

If the users had the export feature there will be reports saved to the destination selected in Enterprise options. If users are on SAAS they will need to choose desktop for the location and then they can copy and paste the CSV files from their RDP desktop to their regular desktop by right clicking on the report and selecting copy
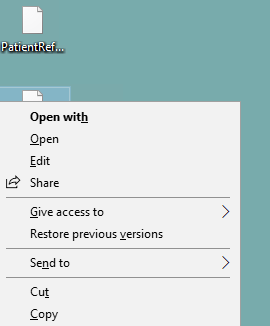
Then minimize the SAAS window and right click on the regular desktop and select paste
The report for the visits in Bill Status will be called PatientRefundData and the report for the visits in no bill status will be called PatientInsRefundData.
For patient refunds the report will show the following parameters (users will need to select include column headers in the Enterprise options for export if they need to know which columns are which). It will use the address of the Patient or Bill to Account if different from Patient.
- Control Key - Number of control refund was processed in
- Account Number - Patient Account Number
- Visit ID - Visit ID found in Visits/Transactions
- Bill to Type - Bill to selected on visit
- TranKey - Transaction Key in SQL. Not shown in the PM
- ChargeKey - Charge Key in SQL. Not shown in the PM
- Bill to code - Bill to account number
- Bill to Name - Name of the Patient
- Bill to Addr 1 - Street Address of Patient line 1
- Bill to Addr 2 - Street Address of Patient line 2
- Bill to City - City on Patient Address
- Bill to State - State on Patient Address
- Bil to Zip Code - Zip code on Patient Address
- Bill to Zip Plus 4 - if filled in on patient address the 4 digit extender for that Zip
- Entry Date - Date Refund was processed and time
- Amount - Amount of Refund
- Trans Code - If patient refund was debit payment this is the pay code used. If adjustment it will show the adjustment code used
- Tran Description - The description of the code from tables
- Fin Location - Financial Location on visit
- Svc Location - Service Location on visit
- Ins Provider - Insurance Provider Code
- Svc Provider - Service Provider on Code
- Bill to CSZ - City, State, and Zip of refund address
- Insurance Full Name - Insurance Provider first and last name
- Service Full Name - Service Provider first and last name
For Insurance Refunds the report will show the following parameters (users will need to select include column headers in the Enterprise options for export if they need to know which columns are which). It will use the Address on the Insurance Plan in Tables under Refund Address.
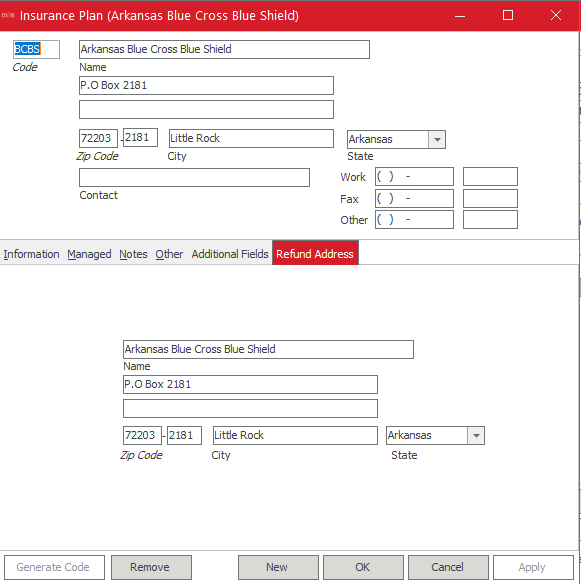
- Payer - Insurance being refunded
- Payer Refund Address 1 - Street Address in line 1 under Refund Address on plan
- Payer Refund Address 2 - Street Address in line 2 under Refund Address on plan
- Payer Refund City - City on Refund Address on plan
- Payer Refund Zip - Zip code on Refund Address on Plan including the 4 digit extender
- Visit ID - Visit in Visits/Transactions
- Patient Name - Patient Name
- Subscriber ID - Insurance ID of patient
- Transaction Amount -Amount of Refund
- IP_Name - Insurance Plan Name
These reports can then be provided the department in the clinic who issues refunds to the patients or insurances for them to send payment.
If users have any questions they can contact support@medevolve.com or call 1-800-964-5129 option 1 for support and a member of support can do a walk through with the user.