MedEvolve has expanded our technology to include a web based Workflow tool. Managing the Revenue Cycle is getting more and more complex, but RCM Workflow Automation makes it simple. This document is going to walk through the features and functionality of the Patient AR module within MedEvolve’s Workflow tool.
How to log into Workflow
Below is the information required to log into Workflow:
- Link to the website. (This will be provided during implementation)
- Username: user’s individual email address
- Password: user’s temporary password (This will be provided during implementation)
- Open the provided link to the website in either Google Chrome , Firefox , or Microsoft Edge . (Do Not Use Internet Explorer )
- Once the required information has been entered, click the “Log In” button.
Initial Steps for Multi-factor Authentication
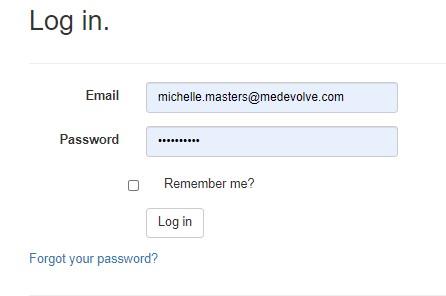
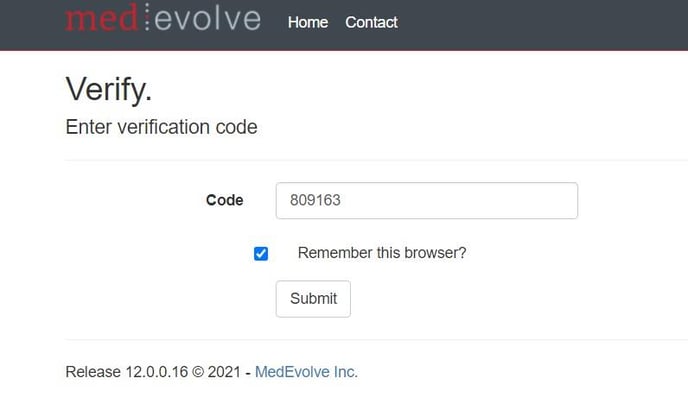
Once the initial log in information has been submitted, users will be taken to the “Two-Factor Authentication Provider” page, which is a required step in order to proceed to the organization’s website.
- Click the “Submit” button to have a one-time use security code sent to the user’s email address that was used for their initial log in. *** NOTE: the email will come from rcmwebservices@medevolve.com ***
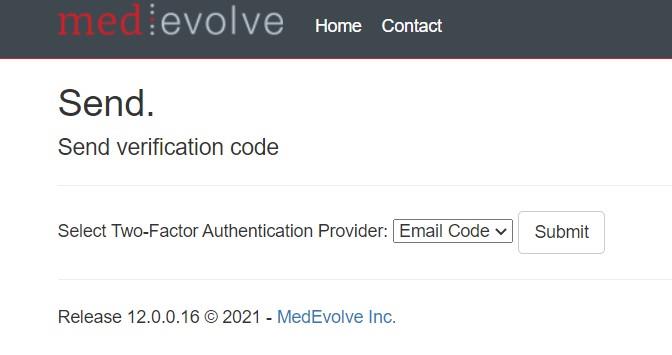
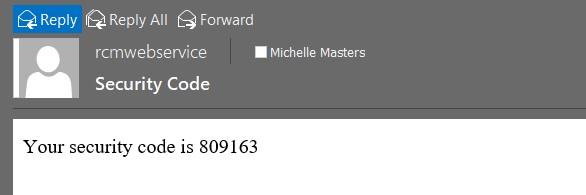
- Next, users will enter the one-time use security code received into the appropriate box as shown below and then check the “Remember this browser” box, which should bypass the MFA requirement for future log in attempts on the same browser.
Steps to Change User Passwords after Initial Log In
During implementation users are provided a temporary password which is shared with their organization’s leadership in order to assist users’ with their initial log in. Below are the steps for those users to change their temporary password to a unique one that only they will know. This new password should never be shared with anyone either inside or outside the organization.
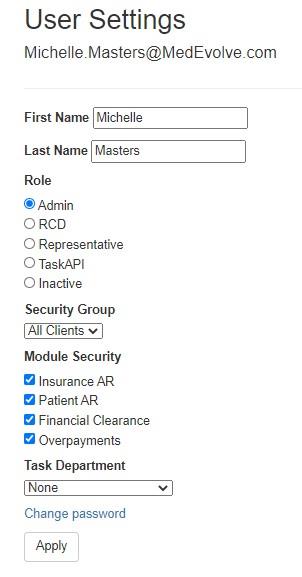
- Once users have successfully logged into Workflow, they will need to click on the “Account” option in the upper right hand corner of the MedEvolve toolbar.
![]()
- This will take them to the User Settings page where there will be a blue hyperlink to change their password.
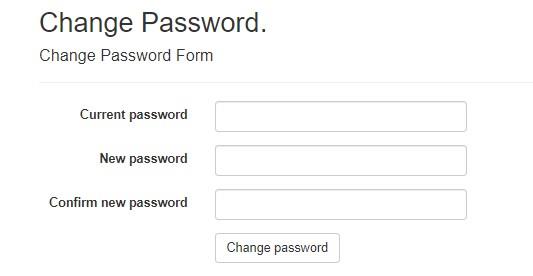
- Once they’ve clicked on the blue “Change Password” hyperlink, users will be prompted to enter their current password, which is their temporary password, and then enter their new password, and confirm it before they are able to click the “Change Password” button to save it.
Home Screen for Representatives
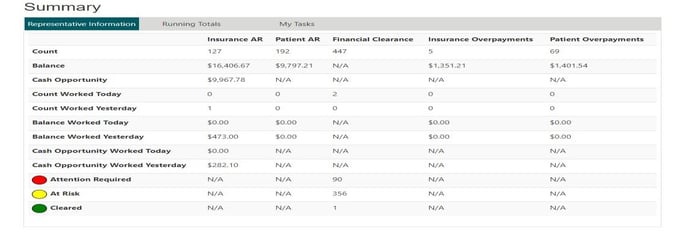
Representatives will be provided access to different Workflow modules based upon the individual roles and responsibilities assigned by their organization. This modules each user has access to within Workflow will be displayed at the top of the columns on their user log in page. Some worklists may not pertain to certain Workflow modules, which will be indicated by the “N/A” displayed in that column.
- Count – Number of claims that qualify for the worklists assigned to the user.
- Balance – Balance of all claims that qualify for the worklist assigned.
- Cash Opportunity – Expected reimbursement for claims that qualify for the worklist assigned.
- Count Worked Today – Number of claims the user worked today.
- Count Worked Yesterday – Number of claims the user worked yesterday.
- Balance Worked Today – Balance of all claims the user worked today.
- Balance Worked Yesterday – Balance of all claims the user worked yesterday.
- Cash Opportunity Worked Today – Expected reimbursement of the claims the user worked today.
- Cash Opportunity Worked Yesterday – Expected reimbursement of the claims the user worked yesterday.
- Attention Required – Number of appointments that qualify for the worklist that fall within a prioritized date range and have not been financially cleared.
- At Risk – Number of appointments that qualify for the worklist that are approaching the prioritized date range and have not been financially cleared.
- Cleared – Number of appointments that qualify for the worklist and have been financially cleared.
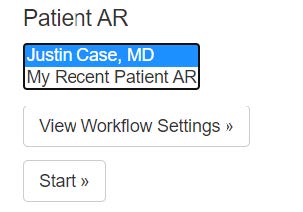
Patient A/R Worklists
The Workflow modules assigned to each user will be displayed on the left side of their home screen. Under the box titled “Patient AR”, users will highlight the worklist to begin working first, then click the “Start” button to launch the worklist. Below are the definitions of the tabs for each patient account the user will navigate through in order to financially clear the patient.
- Current Worklist – This is the list of claims which qualify for that worklist and are configured to allow for optimal collection opportunity.
- Action – This will provide an overview of the patient account, along with any history notes associated with the claim.
- Account – This is where users will review and make edits to basic demographic information when necessary.
- Patient Ledger – This is where users will see transactional data for each date of service at the visit level and is now patient responsibility.
- Statement History – This is where users will view details of statements by aging bucket.
- Documents and Links – This is where users can upload any supporting documentation needed for future reference on the account. i.e. referral from PCP, bookmark for the payer website which states whether an authorization is required for a scheduled appointment or not.
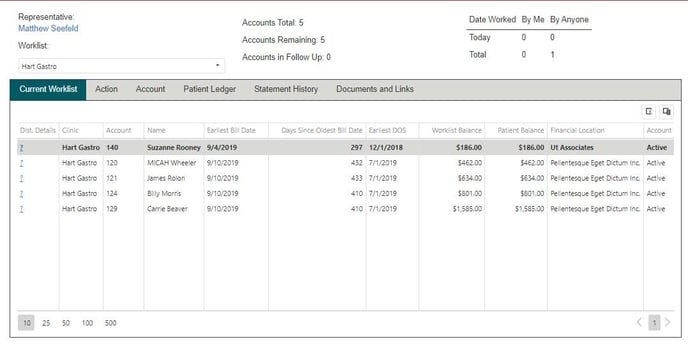
Current Worklist View
Once the worklist has launched, users will be taken to the Current Worklist view. Each Patient AR worklist has been configured to display claims with a summary of the patient open balances.
- This view at the top will provide a summary of the total accounts within the worklist, how many accounts remain to be worked, as well as the number of accounts that have already been worked and are in follow up status. Representatives will also be able to see how many accounts they have worked, as well as those worked by others from that worklist.

- To begin working the first account, users can either select the “Action” tab or click on the first patient within their list.
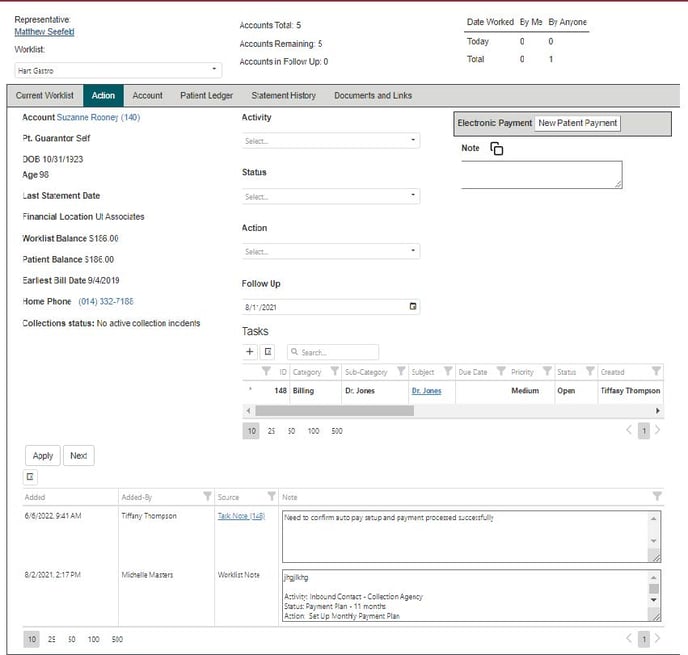
Action Tab Overview
The “Action” tab will provide an overview of the patient account, along with any historical notes associated with the claim. This is also where users will finalize the process on each account by documenting the actions taken in each of the required fields labeled Activity, Status, Action, and Follow-Up Date. There is also a free text box where users will enter their own notes regarding any additional actions taken or needed.
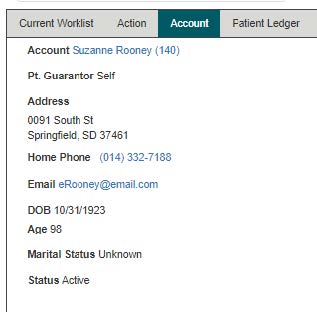
Account Tab Overview
The “Account” tab is where users can review basic demographic information for their patient. This is also where users will add or edit any patient information that needs to be updated when working the account, which is important to note since updates made in Workflow will flow back to the PM within 8-10 seconds.
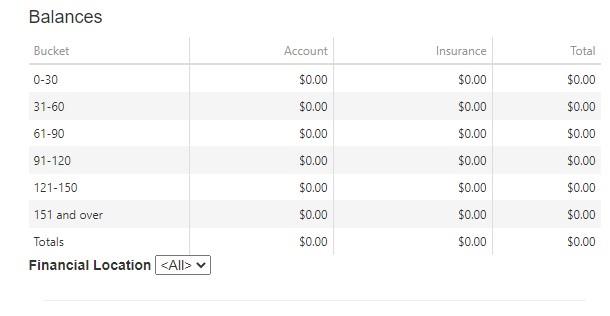
- Balances: Aging buckets on any current or past due balances for both the patient and the insurance company.
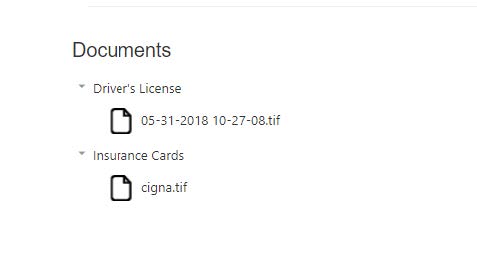
- Documents: Any documents scanned into the MedEvolve PM such as driver’s license and insurance cards will be listed here. If there was a document to be reviewed, there would be an arrow to expand each document group where users could click to download the attachment and open it for review.
- Patient Insurances: All insurance information, as well as the ability to check the eligibility, review previous eligibility statuses, activate or inactivate the coverage, re-sequence the filing order, edit co-pays, or update subscriber information on the account level, will be performed in this section.


- Demographics: All patient demographic information such as address, date of birth, phone numbers, marital status, as well as email address, is available to review and edit in this section.

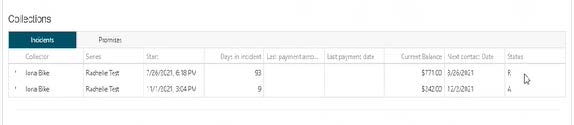
- Collections: Any active or resolved Collections Incidents will be displayed in this section, however the detailed information should be reviewed in the PM.
- Managed Visits: This is where any authorizations or referral information would be added to the account. Users will simply click the “+” sign to create a new managed visit and complete the required fields within the form.


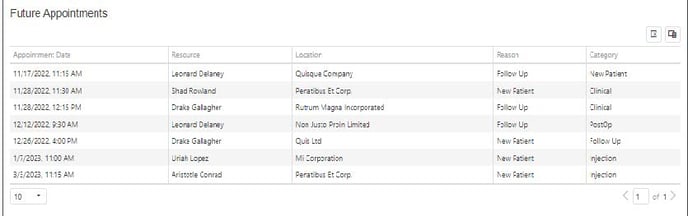
- Future Appointments: Any future scheduled appointments for the patient would be listed in this section for quick reference.
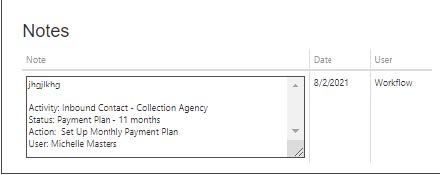
- Notes: Any notes made in Workflow would be displayed here for users to review. The window to review notes can be expanded by clicking on the two diagonal lines in the lower right corner and dragging it downward to view the window.
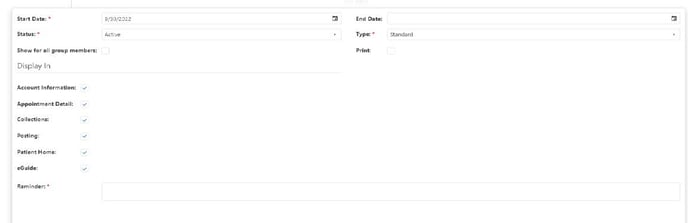
- Reminders: Any items of importance that staff need to be aware of at the time the patient’s account is accessed in the PM, would need to be documented in the free text box of this section. Users will simply click the “+” sign to open the form and complete the fields. For example, if the patient promised to pay their co-pay or pay toward a previous balance, this reminder would need to be created for front desk staff to collect payment from the patient.

Patient Ledger
The “Patient Ledger” is where users will see transactional data for each date of service at the visit level which has now been moved to patient responsibility, and will be displayed by Financial Location. Users have the ability to print the Account Ledger from this tab as well.
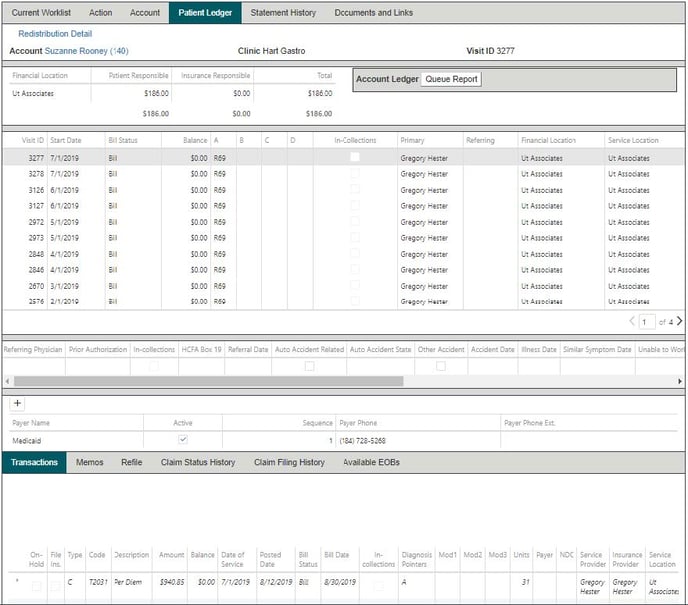
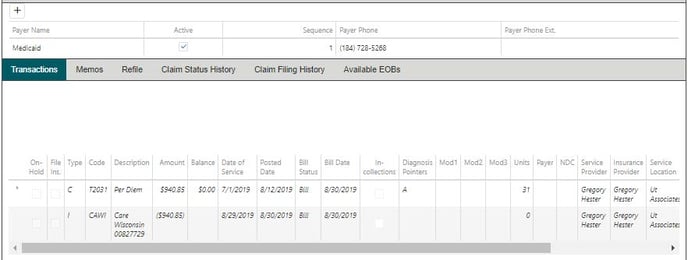
- Transactions: This section is where users will be able to view insurance information and transactions on the visit level for a specific date of service, as well as charges, adjustments, and payments posted on the account.
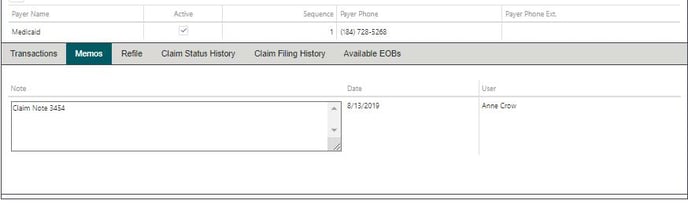
- Memos: This is where any account memos created would be available for review.
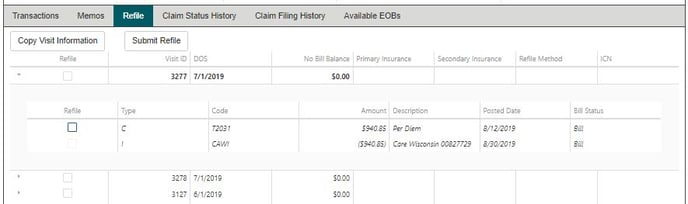
- Refile: This section is where users will review the list of claims and select which one(s) they need to refile directly from within Workflow. Users must expand the arrow next to the visit ID they wish to submit for refile and verify only valid CPT codes will be included with the claim.
- Claim Status History: This section is where users will be able to reference the claim specific status history from the clearinghouse to review when the claim was acknowledged, accepted, rejected, etc.

- Claim Filing History: This section is where users will be able to review all of the claim filing history for a particular claim, as well as the file type and date, and also the date it was created.

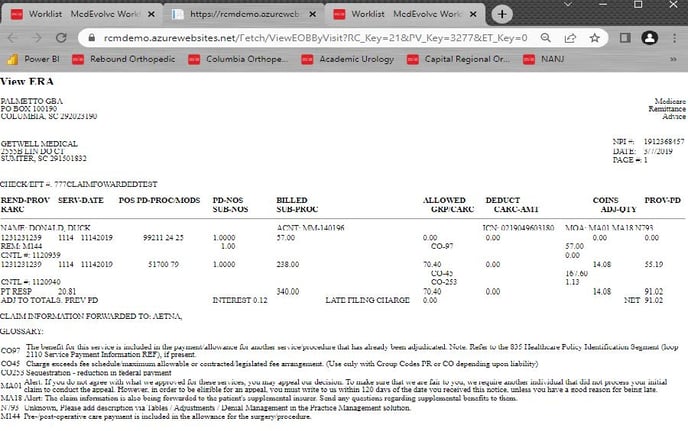
- Available EOBs: This section is where users can review copies of EOBs for the claims that are housed in the MedEvolve PM. Once the user clicks on the EOB, it will open in a separate browser tab to review the details.

Statement History
The Statement History tab is where users can review previous statements that have been generated, as well as the balance on the statement and age of statement balance over time. This information can be sorted in ascending or descending order by clicking on any of the column headers.

Documents and Links
The “Documents and Links” tab is where documents or any correspondence can be uploaded and attached for reference when working this account, as well as bookmarks to a website where research may have been performed.
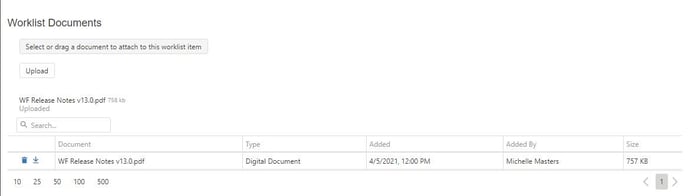
- Worklist Documents: To upload a document, users can click the “Select or drag a document to attach to this worklist item” button, and choose a document they have saved on their desktop or share file to upload it. Once the document has been uploaded, it will be available for others to download and open to review when they are working the account. If the wrong document is uploaded, simply click the blue trash can icon next to the document to delete it.
- Bookmarks: To add a website where research was performed, simply click the “+” sign and copy and paste the website into the Address field and then name what the link is in the Description field, and click “Save”.

![]()
![]()
Processing a Payment
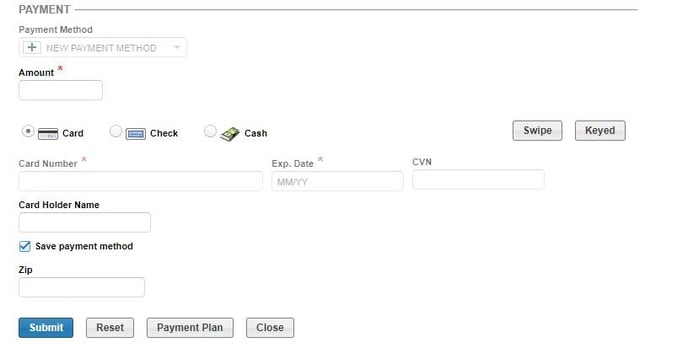
Users have the ability to take a patient payment within the Patient AR module in Workflow. To do this, users will need to perform this function from the “Action” tab by clicking on the “New Patient Payment” button on the right upper portion of the screen.
![]()
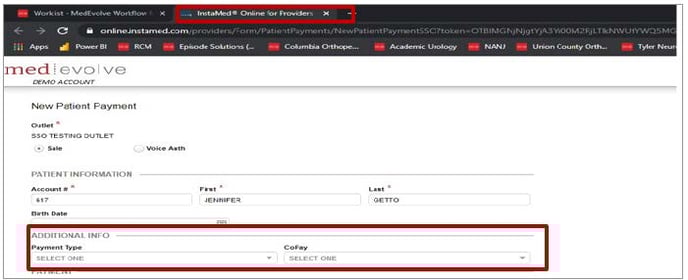
- Electronic Payment: Users will click the “New Patient Payment” button, which will launch a new browser tab to connect to InstaMed and complete steps to process the payment.

- In the new browser window, the Patient Information required fields will default to the patient’s information. Users will need to go to the Additional Info section to make the appropriate selections from the drop down menus for “Payment Type” and “Co-Pay”.
- Next, users will complete the “Payment” section by entering the payment method, as well as the payment amount, credit card information, or the routing and account number if the patient is paying by check and click “Submit”.
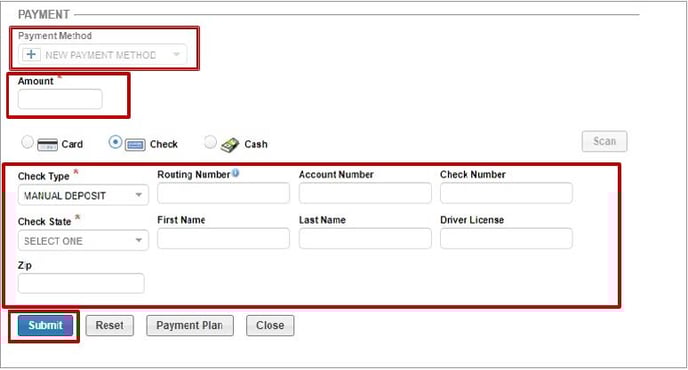
- If the patient provides permission, users have the ability to save the credit card information on file for future payments by checking the “Save Payment Method” box.