
All screenshots taken from Playground Environment.
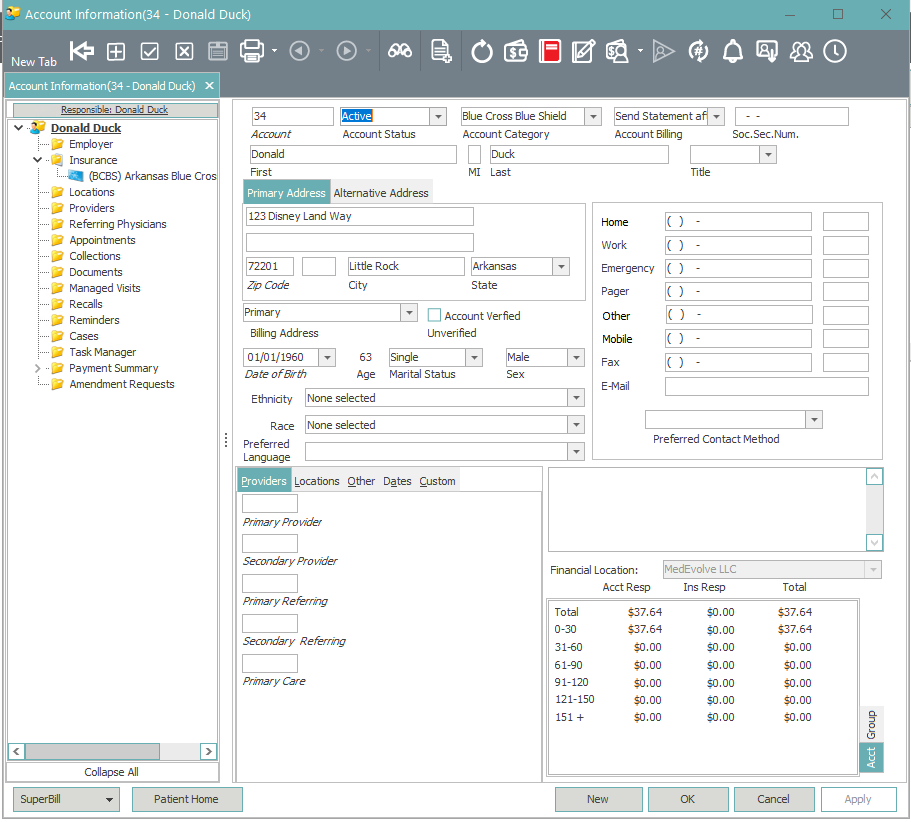
Icons from Left to Right
- New Tab - This will only show if the user does not have Single Instance Mode checked in their Preferences

- Dock Arrow - This will allow users to dock account information. If docked they could hover over the docked tab and it will bring up account information without clikcing

- New - Allows user to create a new account (same as button on lower right side of account window)

- Apply and Exit -Same as hitting OK option in bottom right side of account window

- Cancel and Exit - Same as hitting Cancel in bottom right of account window

- Apply Changes- Same as hitting Apply in bottom right of account window. Will only highlight if changes have been made. It will apply changes and leave account open

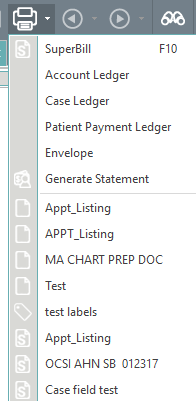
- Print - Will allow users to print standard items (above the line) Superbill, Account Ledger, Case Ledger, Patient Payment Ledger, Envelope, and Generate statement. Will allow users to print demand print options created by users in document templates.
- Back - If the user has loaded multiple accounts and still has account window open will allow user to look at the patient previous

- Forward - If the user has loaded multiple accounts and still has account window open will allow user to look at patient viewed after the current patient

- Patient Search - This brings up the patient search window. It would be the same as clicking on italicized word account

- Add New Selection - Will allow the user to add an account status if the user has rights to add account status in tables

- Refresh Account - Will refresh the account information window

- Account Visits/Transactions - Will allow the user to see any visits associated with the patient and the transactions entered in for that patient.

- Account Documents - Will allow users to view documents already attached to account or add a new document to the account

- Account Memo - Will allow users to see any memos (system generated or manually added by user) on the account

- Browse Statement Archive - Will allow you to view statements generated for the account. Latest statement will show you the last statement generated for the account if statements exist. Browse statement archive will bring up listing of all the statements generated for the account.

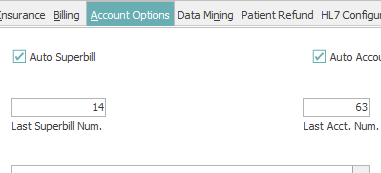
- Generate Next Account Number - This can be used when creating a new account or changing an account number. If the auto account numbers option is checked and the last account number field is filled in then it will generate the next number in sequence. This option will only be available if creating a new account or if the icon for change account number is clicked.

- Change Account Number- Allows users to change the account number for a patient. The user will click inside account number field, click the icon to change the account number, and then select icon to generate next account number

- Show Popup Reminders - Will show any popup reminders for the account

- Patient Inbound Queue - If clients are set up to process in HL7 messages for demographics and/or patient insurance information this icon can be selected to find any new demo or ins information from patient from the other vendor. If highlighted red it means current patient has information in the demographic InBound Queue.

- Next of Kin - Used to keep information for next of kin. Accounts can have more than one. The patient can also advise if they are an authorized user for the account or primary contact.

- Appointment Sets - Will show any appointment sets option available and can then schedule the patient for an appointment set.

Account Demographics
- Account - Account Number assigned to account
- Account Status - Indicates the status of the account. Flags on the account status pull from Tables-->Account-->Account Status
- Account Category - Category of account. Will default account billing based on Account category in Tables
- Account Billing - Indicates when and if an account will receive a statement
- Soc. Sec. Num. - Social Security Number for patient on account
- First - First Name of Patient
- MI - Middle Initial of Patient
- Last - Last Name of Patient
- Title - Dr., Mr., Mrs., Ms.
- Primary Address - Primary Street Address of the Patient. If billing address is set to Primary this is the address statements will be sent to
- Alternative Address - Alternative Address if the patient has one. If Billing Address is set to Alternative this is the address statements will be sent to.
- Account Verified - This check indicates that the information on the account is accurate. This is checked manually by a user and each clinic will decide what all checks are needed in order for the account to be 'verified'. If checked the account will show green for the patient name on the scheduler.
- Date of Birth - Patient Date of Birth
- Age - Patient Age Calculated Automatically based on current date in relation to Date of Birth
- Marital Status - Marital Status of Patient: Divorced, Legally Separated, Life Partner, Married, Single, Unknown, Widowed
- Sex - Sex of Patient. Male, Female
- Ethnicity - Ethnicity of Patient
- Race - Race of Patient
- Preferred Language - Language the patient is most comfortable speaking
- Contact Information
- Home: Home Phone Number (can be used for Patient Messaging Module)
- Work: Work Phone number
- Emergency: Phone number to call for Emergency
- Pager: Pager Number
- Other: Other number (can be used for Patient Messaging Module)
- Mobile: Cell Phone Number (can be used for Patient Messaging Module)
- Fax: Fax Number if patient has a fax number
- Email: Email Address for patient
- Preferred Contact Method: which contact method does a patient wish to receive communication from the clinic
If the preferred contact is one of the following that will be the number for patient messaging module if they have not opted in for text. Home, Other, or Mobile. These will be displayed on the scheduler
- Providers tab
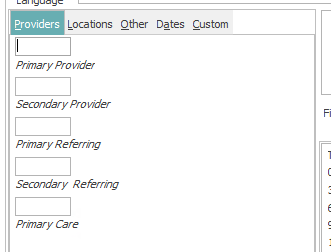
- Primary Provider - usually used to show which doctor the patient primarily sees at the clinic
- Secondary Provider - usually used for the second option if the doctor the patient usually sees is out of clinic
- Primary Referring - Usually used to indicate who typically refers the patient to the clinic
- Secondary Referring - Usually used to indicate who else has referred the patient
- Primary Care - Primary Care Physician of the patient.
- Locations tab
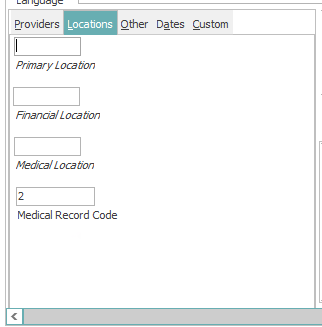
- Primary Location - Used for noting which location the patient is seen at most often
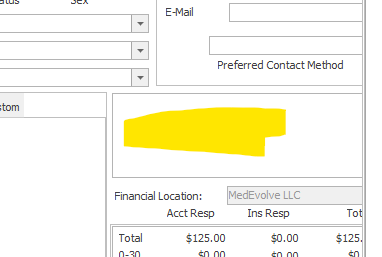
- Financial Location - If multiple financial locations are set up for a clinic which one does the patient usually get billed from
- Medical Location - Used for Primary service location
- Medical Record Code - If the EHR has a different number for the same account it could be entered here. It will default to the account number when account number is created in MedEvolve
- Other Tab
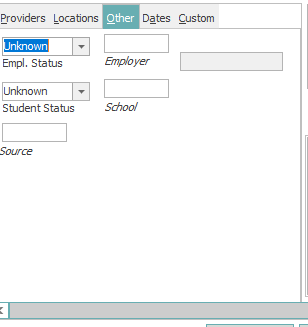
- Empl. Status
- Unknown
- Full Time
- Not employed
- Part Time
- Retired
- Self Employed
- Employer Field - If the employer is set up in Clinic Table under Tables Employer they can be selected here
- Student Status
- Full Time
- Not Student
- Part Time
- Unknown
- School Field - If the patient goes to school and the school is listed in clinic tables under Tables School the school can be selected here
- Empl. Status
- Dates Tab
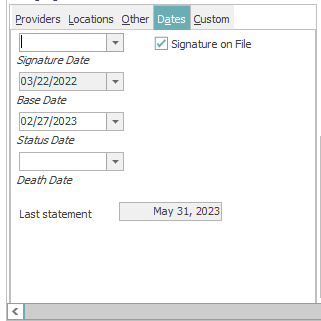
- Signature Date - Signature on File will default to be checked but if users have forms that require signature they can fill in the date here
- Base Date - The date the account was created
- Status Date - Based on account status and when the account was put into that current status
- Death Date - When a patient is marked as deceased what is the Date of that patients death. It can only be filled in for deceased status.
- Last Statement Date - Will show the date of the last statement the patient received if the patient has received statements. If the patient has not received statements this will remain blank.
- Custom Tab
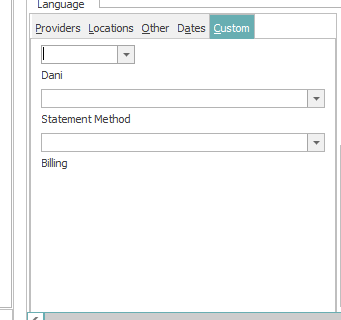
- The custom Tab can be used for certain information that is not currently available as a field option on the account demographics window.
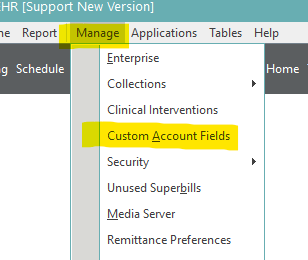
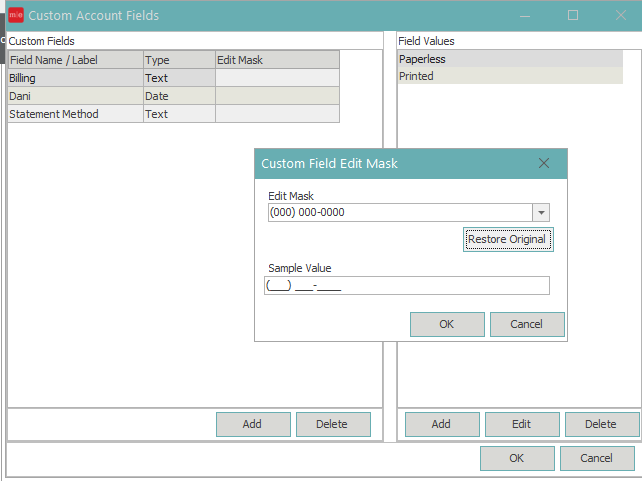
- Custom Fields can be added by going to Manage Custom Account Fields
-
- Users can then choose add and enter the information they want to see along with the field values.
- Free text notes box - This can be used to make notes on the patient account without creating a memo. It is free text and can be edited as needed.
- Account Balance - Will display any balances and will show if it is in No Bill status (meaning insurance responsible) or Bill Status (Patient Responsibility). It also shows the aging of the balance and total for the account.
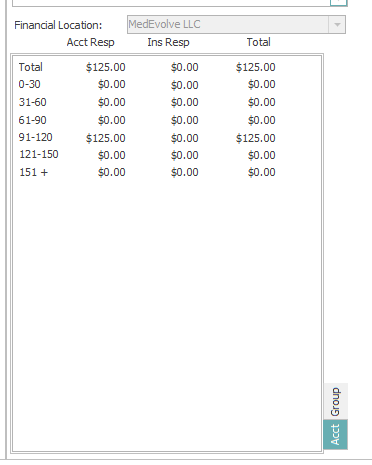
- Acct Tab - If grouped or ungrouped with another account this is the balance for the current account
- Group Tab - If grouped with another account will show the information for the group balance as well.
- Users can then choose add and enter the information they want to see along with the field values.
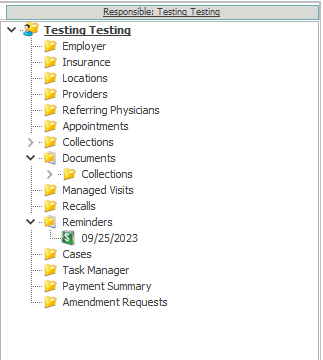
- Patient Tree
- Name - Name of the patient will be displayed. If Ungrouped with another account Responsible will default to reflect same name as patient. If grouped with another account
- Employer - If filled in on Other Tab will show the employer here
- Insurance - If patient has insurance listed it will display under this folder
- If active it will display right under insurance
- If Inactive it will display in folder named Inactive
- To add a new insurance plan to the account right click on insurance folder and select new. Then fill in the information for the insurance plan
- Locations - If Locations are filled in on Locations tab they will display here
- Providers - If providers are filled in on Providers tab they will display here
- Referring Physicians - If displayed in Providers tab they will display here
- Appointments - If the patient has had any appointments scheduled they will show here
- Appointments that are current date or forward will display right under appointments
- If the appointments are past dates they will display in Past Folder
- If the appointments were cancelled by patient they will display in cancelled by patients folder
- If the appointments were cancelled by office they will display in cancelled by office folder
- Right click options include:
- New: Schedule an appointment for the patient
- Add to Wait List - Add the patient to the wait list
- Message History - If the clinic uses Patient Messaging Module any messages for the appointments will display
- Right click options from an appointment listed on patient tree
- View - View the appointment detail screen
- View Status History - View the status history and dates of those status
- Cancel Appointment - By Patient or By Office
- Copy to Wait List - Will keep original Appointment but will also add information to wait list
- Move to Wait List - By Office or Patient. Will remove original appointment and move to wait list
- Message History - If client used Patient Messaging Module the message history for this appointment will be displayed
- Create Task - Creates a task in the PM for a team or user to review certain information.
-
- Collections - If the patient has any collections incidents the incidents will display here
- If the incidents have been resolved they will display here under the Resolved Folder
- Right click option
- New Incident - This allows users to create a new collections incident manually instead of running the collections process and allowing the account to be put into a collection incident from the process
- If a collections incident past or current exists right click options
- View - View the collection incident
- Create Task - Create a task for a user or group to review
- Collections - If the patient has any collections incidents the incidents will display here
-
- Documents - Documents attached to the account will display under this folder.
- If there are document groups they will display in separate folders under documents
- Right click option
- New - Add a document to the account either by scanning or uploading one already saved to computer
- If document already exists right click option will be view
- Managed Visits - These are used for referrals and keeping track of how many visits they are allowed based on that referral and authorization number.
- Right click option
- New - Create a new managed visit that can be attached to a visit in Posting
- If Managed Visit does exist users can double click to see the information on the managed visit
- Right click option
- Recalls - If there is a patient recall listed on the account it will display here.
- Right click options
- New - Create a Patient Recall for the account
- Recall Message History - If the client is set up to use Patient Messaging Module and have set up Recall Messaging the recall messages will display here
- Right click options
- Reminders - This is for reminders for the patient accounts which can also be set for Pop Up Reminders
- Some reminders are automatically generated such as collections (if enable pop ups is selected on series and levels), global period etc. Others can be added manually by users
- Right click option New - Create a reminder for patient account
- If reminders have been completed for an account they will show under completed folder under reminder
- Cases - Cases are similar to Managed Visits as it can be used to prepopulate information. These are used if there is a situation where the patient wants to set up the cases by managed visits and select that case when posting so the insurance and authorization can already be selected for that visit
- Right click options
- New - Create a new case for the account
- If cases are already created you can right click on the case to view the information.
- Right click options
- Task Manager - Any task listed for this account will display here
- Right click options
- New - Create a new task for the account
- If tasks currently exist for the account users can right click and select view or double click to see information for the task.
- Right click options
- Payment Summary - Shows the most recent 10 payments for the account
- Patient Folder - Will show the past 10 patient payments posted
- Insurance Folder - Will show the past 10 Insurance payments posted
- Amendment Requests - No longer used as it was part of our EHR system that we no longer offer
- Documents - Documents attached to the account will display under this folder.
- Buttons at bottom of Account Window
- Superbill - If there is a document created by users in Document templates that are selected as a superbill they will be available in this option
- Patient Home - No longer used as it was part of our EHR system which is no longer offered.
- New - Create a new patient. Only highlighted if a patient is already selected.
- OK - Apply and Exit
- Cancel - Leave account
- Apply - Save any changes made to account but stay on account window